Table of Contents
Fiber optic cables are widely used in modern networking and telecommunication systems due to their high speed, efficiency, and reliability. Terminating fiber optic cables properly is an essential skill for anyone working with this type of cable. In this article, we will explore how to terminate fiber optic cables, providing step-by-step instructions and tips on achieving a successful termination. Whether you are a technician, an engineer, or someone looking to learn more about the process, this guide will help you understand the importance of proper termination and how to execute it with precision.
What is Fiber Optic Cable?
Before diving into the process of terminating fiber optic cable, it’s important to understand what it is. Fiber optic cables are made of glass or plastic fibers that transmit data in the form of light pulses. These cables are used in various applications, including high-speed internet connections, cable TV, and telephone systems. They are preferred over copper cables because of their faster data transmission capabilities and the ability to cover longer distances without losing signal quality.
Why is Termination of Fiber Optic Cable Important?
Termination of fiber optic cable involves attaching connectors to the ends of the fibers so they can be connected to devices like switches, routers, or other networking equipment. Proper termination is essential to ensure a stable connection and reliable data transmission. Poorly terminated cables can lead to signal loss, decreased performance, and even complete failure of the fiber optic link.

Types of Fiber Optic Connectors
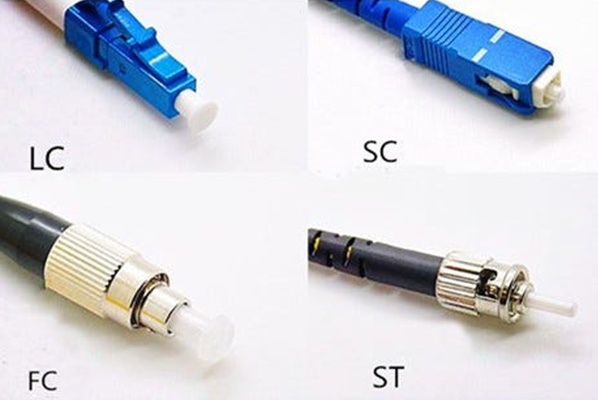
When learning how to terminate fiber optic cable, it’s important to understand the types of connectors you will be working with. The two most common types of fiber optic connectors are:
- SC Connector (Subscriber Connector): A popular connector used for both single-mode and multi-mode fiber optic cables. It is often used in telecommunications and data networks.
- LC Connector (Lucent Connector): A smaller version of the SC connector, it is frequently used in high-density applications.
- ST Connector (Straight Tip): A connector that uses a bayonet-style coupling mechanism, commonly used in older systems.
- MTP/MPO Connector: These are multi-fiber connectors typically used for high-density applications.

Choosing the right connector depends on your specific needs and the type of equipment you’re working with.
How to Terminate Fiber Optic Cable: Step-by-Step Process
Now that we understand the basics, let’s look at the process of terminating fiber optic cable. Whether you are a professional or someone learning how to terminate fiber optic cable for the first time, these steps will guide you through the procedure. First, you need to have a fiber optic termination kit. The following article will help you find the best tools for termination.
1. Gather the Necessary Tools and Materials
Before you begin the termination process, you’ll need to gather the following tools and materials:
- Fiber optic cable: The cable you need to terminate.
- Fiber optic connectors: Choose connectors based on your requirements (SC, LC, etc.).
- Fiber optic stripper: A specialized tool used to strip the outer jacket and buffer coating from the fiber.
- Fiber cleaver: A tool that provides a clean and precise cut on the fiber.
- Crimping tool: Used to secure the connector onto the fiber.
- Epoxy or adhesive: For bonding the fiber to the connector.
- Fiber optic microscope: To inspect the terminated connector for flaws.
- Cleaning supplies: Isopropyl alcohol, lint-free wipes, and fiber optic cleaning tools to remove dust and debris.
2. Prepare the Fiber Optic Cable
The first step in how to terminate fiber optic cable is to prepare the cable itself. Start by stripping the outer jacket of the fiber optic cable using the fiber optic stripper. Be careful not to cut or damage the internal fibers during this process.
- Strip the Outer Jacket: Use the stripper tool to remove about 2-3 inches of the outer jacket. This will expose the inner fibers.
- Strip the Buffer Coating: Once you have exposed the fibers, strip the buffer coating off the fiber. This can usually be done by using the stripper tool to remove about 1-2 inches of the buffer coating.
Be sure to handle the fiber with care, as it is fragile and can break if mishandled.
3. Clean the Fiber
Fiber optic cables are very sensitive to dust, dirt, and oils, so cleaning the fiber is an essential part of how to terminate fiber optic cable. Use lint-free wipes and isopropyl alcohol to clean both the fiber and the connector end. Make sure the fiber is completely dry before proceeding to the next step.
4. Cleave the Fiber
To ensure a proper connection, the fiber must be cleaved (cut) at a precise angle. Use a fiber cleaver to cut the fiber. This tool will give you a clean, straight cut, which is critical for making a good connection. The cleave should be as clean and smooth as possible to avoid signal loss.
- Place the Fiber in the Cleaver: Secure the fiber in the cleaver and follow the manufacturer’s instructions for cutting.
- Check the Cleave: Inspect the cut to ensure it is smooth and free of any irregularities. You can use a microscope to closely examine the fiber.
5. Attach the Connector
The next step in how to terminate fiber optic cable is to attach the connector to the cleaved fiber. This step will vary depending on the type of connector you’re using (SC, LC, etc.), but the general procedure remains the same.
- Insert the Fiber into the Connector: Gently insert the cleaved fiber into the connector. If you are using an adhesive-based connector, apply the epoxy to the fiber and connector according to the manufacturer’s instructions before inserting the fiber.
- Secure the Connector: Use a crimping tool to secure the connector onto the fiber. This will ensure a firm connection that prevents the fiber from slipping out.
Make sure the connector is aligned properly and the fiber is fully inserted to ensure optimal performance.
6. Cure the Adhesive (If Necessary)
If you are using an epoxy-based connector, it will be necessary to allow the adhesive to cure. This process can take anywhere from 15 minutes to an hour, depending on the adhesive. Some connectors may require a curing oven or UV light for faster curing.
- Let the Adhesive Set: Allow the connector to cure for the recommended time to ensure a strong bond between the fiber and the connector.
7. Test the Connection
Once the connector is attached and the adhesive has cured (if applicable), it’s time to test the connection. Use a fiber optic tester to check for any issues with the signal. This step is crucial to ensure that the termination is successful and that the cable is functioning properly.
- Check for Signal Loss: Use the tester to measure the loss of signal through the terminated fiber. Ideally, there should be minimal to no signal loss.
- Inspect the Connector: Use a microscope to check for any defects or issues with the connector, such as cracks, dirt, or an improper cleave.
8. Repeat for Additional Fibers
If you’re working with a multi-fiber cable, you’ll need to repeat this process for each individual fiber in the cable. Be sure to follow the same steps to ensure each fiber is terminated correctly.
Tips for Successful Fiber Optic Termination
- Work Slowly and Carefully: Fiber optic cable is delicate, and any mistakes can lead to signal loss or failure. Take your time and work carefully throughout the process.
- Use the Right Tools: Using high-quality tools designed for fiber optic work will ensure the best results. Cheap or inappropriate tools can cause more harm than good.
- Cleanliness is Key: Always ensure that the fibers, connectors, and tools are clean. Dust and debris can cause signal degradation and poor performance.
- Inspect the Fiber and Connector: Always check your work with a microscope and tester to ensure that the fiber optic cable is terminated properly.
Conclusion
Terminating fiber optic cables is a critical skill for anyone involved in networking and telecommunications. By following the steps outlined in this article, you can ensure a high-quality, reliable connection that will perform well over time. Whether you’re a professional or someone learning how to terminate fiber optic cable, these guidelines will help you achieve the best results.
If you’re wondering how to terminate fiber optic cable or how do you terminate fiber optic cable, remember that careful preparation, the right tools, and attention to detail are the keys to success. Practice these steps, and you’ll be able to terminate fiber optic cables like a pro, ensuring stable and efficient communication networks for years to come.